RELOOP RP-8000
SETUP
Connections
Normally the RP-8000 will be used as a Digital Vinyl System (DVS) also known as Timecode mode. Up to 4 x RP-8000 units may be linked (chained) as per the following diagrams. Connect one RP-8000 with a USB port of your computer and use the provided USB/link cables to connect any additional unit as Slave units.
Use the provided RCA (or any standard RCA) cables to connect each RP-8000 with the Line/Phono Inputs of your DVS Ready Audio Interface or Mixer.
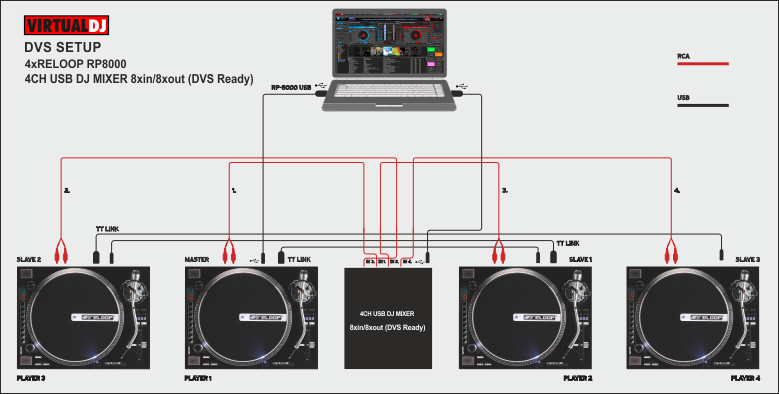
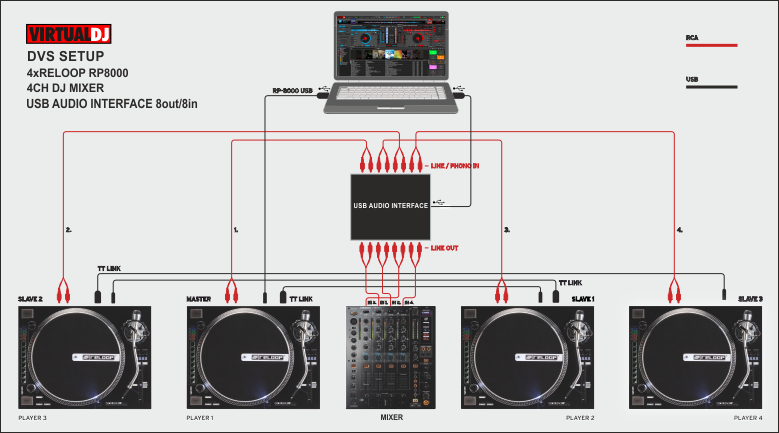
For each timecode Input (RP-8000) a stereo input and a stereo output channel is required. E.g. for a 2xRP-8000 setup a USB Audio Interface 4out/4in or a USB 2-channel mixer 4out/4in is required at least.
Connect the RP-8000 units to AC using the provided cables and power on from the top On/Off switchers.
Firmware & Drivers
Firmware: Update the firmware of each unit to the latest version. Note that some of the features mentioned in this guide may not be available with outdated firmware. http://www.reloop.com/reloop-rp-8000
Drivers: No driver software is required for the Reloop RP-8000 to be installed. The device is USB class compliant and your Operating System will auto-install the necessary driver when connected via USB cable or linked as Slave unit.
VirtualDJ Setup
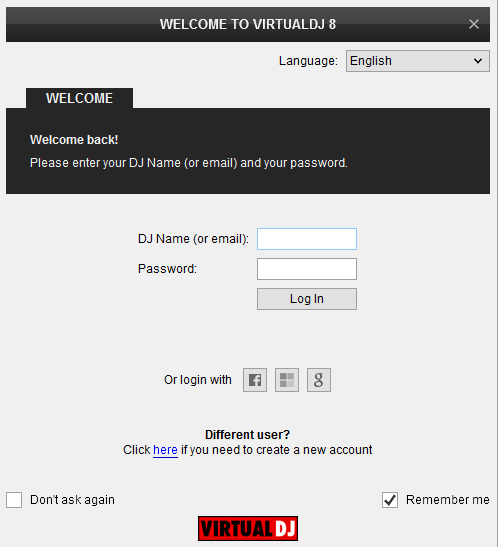
Once VirtualDJ 8 is launched, a Login Window will appear. Login with your virtualdj.com account.
A Pro Infinity or a Pro Subscription License is required to use the Reloop RP-8000 as MIDI controller.
Without any of the above Licenses, the controller will operate for 10 minutes each time you restart VirtualDJ.
http://www.virtualdj.com/buy/index.html
Click to OK.
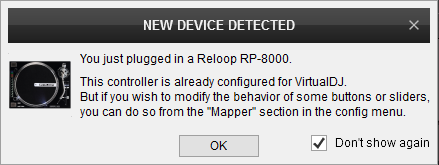
Unit is now to ready to operate with VirtualDJ.
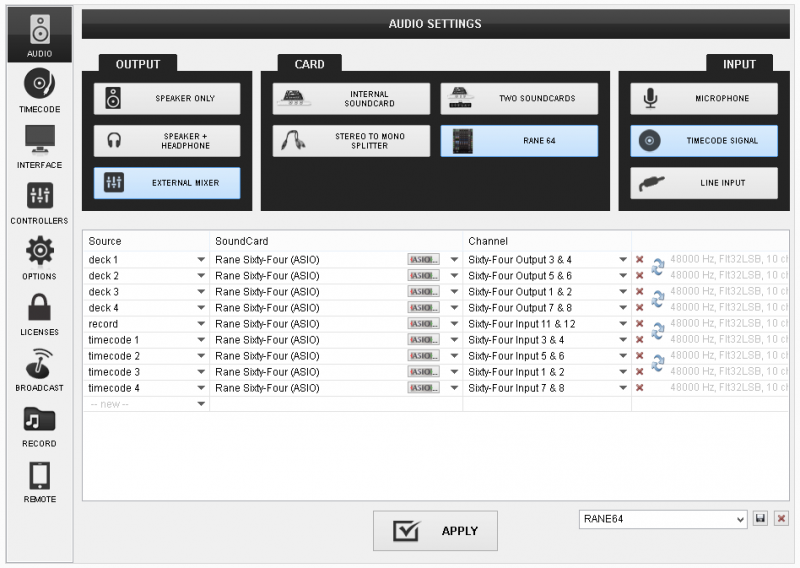
Audio Setup
By default VirtualDJ 8 will send the Master Output to the built-in (default) sound card of your computer.
The right-sided image is showing the pre-defined audio configuration when a Rane 64 mixer is used (DVS-ready).
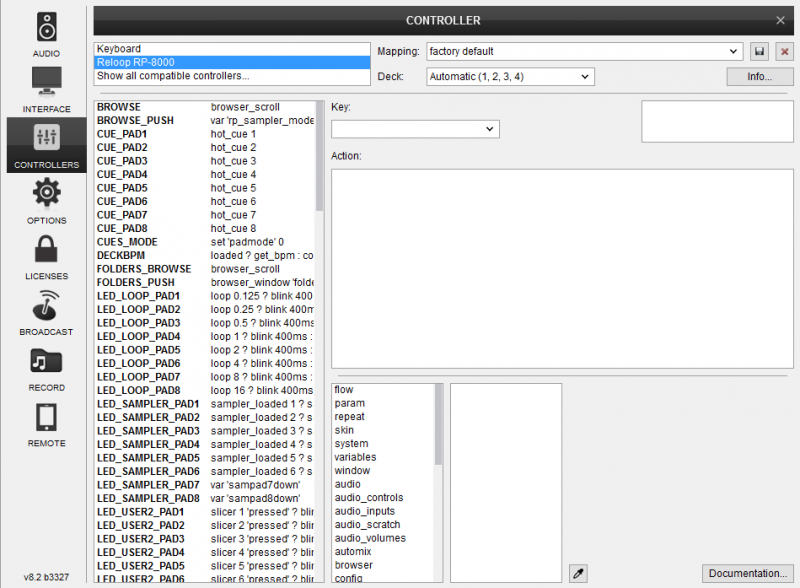
MIDI Operation
Note that each unit is assigned to Decks 1,2,3,4 by default. See Software Controls on how to assign each RP8000 to control a specific VirtualDJ Deck
Find more details at
http://www.virtualdj.com/wiki/VDJ8script.html
For further software settings please refer to the User Guides of VirtualDJ 8.
http://www.virtualdj.com/manuals/virtualdj8/index.html
LAYOUT
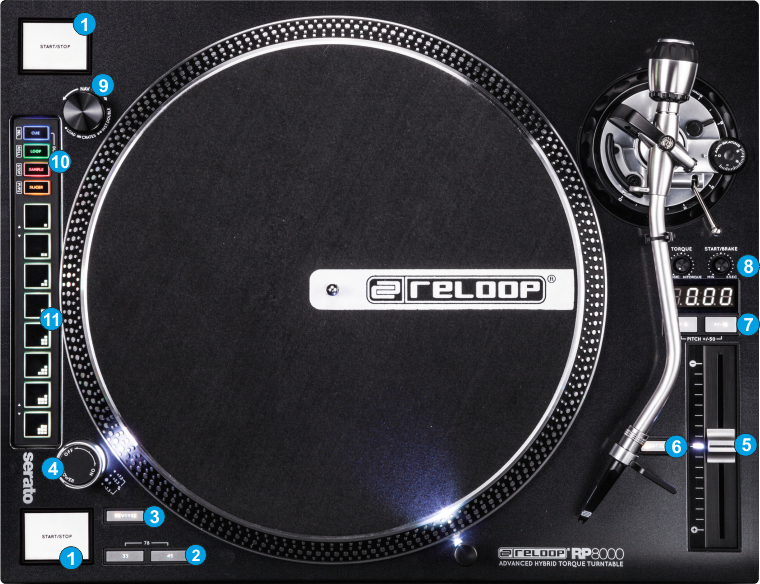
The functionality of each button and knob (as shown in the image below) will be explained in detail in the next chapters
Hardware Turntable Controls
VirtualDJ Controls
Rear Panel - Connections
Hardware Controls
Below is a short description for the basic Hardware controls of the Reloop RP-8000 hybrid turntable. Further details can be found in the Instructions manual http://www.reloop.com/media/catalog/product/pdf/2/2/8/228337_Reloop_IM.pdf
- START/STOP. Start/stop the record.
- SPEED. Select a speed of 33, 45 or 78 RPM (if both buttons are pressed simultaneously).
- REVERSE. Press this button to reverse the playback. Press again for normal playback.
- ON/OFF SWITCH. Turn anti-clockwise to power off and clock-wise to power on the unit.
- PITCH. Adjust the tempo of the playing track. The pitch value will be displayed on the LCD *.
- QUARTZLOCK. Use this button to deactivate the pitch adjustment (the LED will be turned on). By pressing again the fine adjustment will be re-activated, the turntable will return to the speed set via the pitch fader and the LED will turn off. The Quartz Lock LED will be lit when in original pitch and when pitch fine adjustment is deactivated; when the pitch differs, it will go out.
- PITCH RANGE. Select a pitch range of +-8%, +-16% or +-50% (if both buttons are pressed simultaneously).
- TORQUE – START/BRAKE SPEED. Use the START/BRAKE knob to adjust the motor‘s start/stop time in a range of 0.2 (dial to the left) – 6 seconds (dial to the right).
Use the TORQUE knob to adjust the motor‘s torque in a range of 1.6 kg/cm (dial to the left) – 4.5 kg/cm (dial to the right).
Note that each one of the previously mentioned controls is capable of sending MIDI messages and those* are pre-assigned with VirtualDJ script actions. However, since those will still keep controlling the hardware features of the unit, the assigned actions are disabled if Timecode is enabled on this channel/deck.
In case you need to use the MIDI functionality of these controls (e.g. to use the RP-8000 as a backup MIDI controller):
- Power Off the unit
- Hold down both the TRAX (9) and SAMPLER mode button and then power on the unit.
- Press PAD Nr.1 to enable (led on)/disable (led off) the MIDI functionality of the hardware controls.
- Push the TRAX encoder (9) to save setting.
*Pre-assigned controls: START (1), REVERSE (3), PITCH (5) and PITCH RANGE (7)
LCD Display
The LCD can display the Pitch or the BPM value if in manual display mode or both (auto-cycle) if the automatic mode is selected.
Important: Make sure the firmware of the unit is updated to the latest version in order the recently added BPM functionality is available.
To toggle between the automatic/manual BPM/Pitch value indication mode:
- Hold down both the TRAX (9) and SAMPLER mode button and then power on the unit.
- Press PAD Nr.3 to enable (led on)/disable (led off) the automatic BPM/Pitch display mode.
- Push the TRAX encoder (9) to save setting.
If the manual indication mode is selected, hold down the TRAX encoder (9) and then press the +-16% Pitch range button to toggle between the Pitch and BPM value display.
Software Controls
DECK ASSIGN
The RP-8000 is offering 4 individual MIDI channels and those are pre-defined to control 4 separate VirtualDJ decks. Each RP-8000 unit can be assigned to a MIDI channel/deck as following:
- Hold down the TRAX (9) encoder for approximately 3 seconds.
- The LCD Display will then indicate the selected MIDI channel
- Turn the encoder to select a MIDI Channel (1 to 4) or use Pads 1 to 4
BROWSER NAVIGATION
- TRAX ENC/PUSH. Use the encoder to scroll through the tracks of the Songs List.
Push the encoder to load the selected track from the Songs List to the assigned deck.
Push the encoder and then turn the encoder slightly to set focus to the folders list. You can then release the TRAX button and use the encoder to scroll through folders.
Push the encoder again to set the focus back to the Songs List.
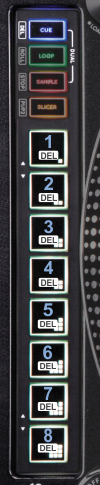
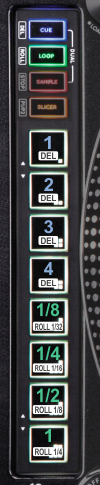
PADS
- PAD MODE SEL. Use these buttons to set the PADS (11) to one of the available Pad modes
- PADS. The 8 Pads offer different functionality, depending on the selected Pad mode as explained below
HotCues mode
The Hotcues Pad page will be automatically displayed on the PADS section of the default VirtualDJ GUI
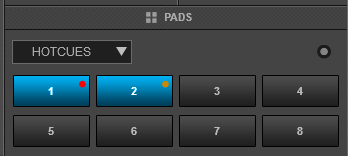
Each one of the 8 pads assigns a Hot Cue Point (1 to 8) or returns the track to that Hot Cue Point.
When a Hot Cue Button is unlit, you can assign a Hot Cue Point by pressing it at the desired point in your track. Once it is assigned, the Hot Cue Button will light up.
Hold the CUE button down and then press any of the pads to delete its assigned Hot Cue Point.
Loop mode
The Loop Pad page will be automatically displayed on the PADS section of the default VirtualDJ GUI
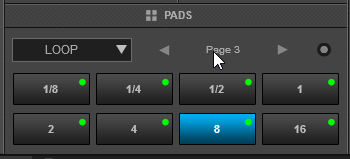
Each one of the 8 pads triggers a loop of a different size in beats (as per the image) from 1/8 to 16 beats.
While a Loop is enabled, hold down the LOOP mode button and then use the TRAX encoder (9) to move the loop forward or backwards by half the size of the triggered loop.
Loop Rolls
While the Loop mode is selected, press the LOOP mode button again to set Pads to Loop Roll mode
(Led will blink).
The Loop Pad page will be automatically displayed on the PADS section of the default VirtualDJ GUI
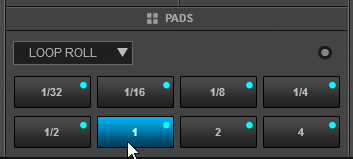
In Loop Roll mode, each one of the 8 Pads triggers a momentary (while pressed) Loop Roll of a different size in beats as per the image (from 1/32 to 4 beats).
When the pad is released, the track will return to the position it would have been if the Loop Roll was never triggered.

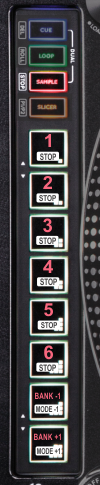
Sampler mode
A special RP-SAMPLER page will be automatically displayed on the PADS section of the default VirtualDJ GUI
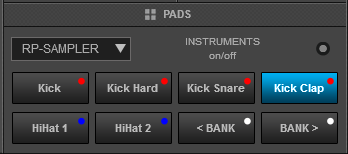
Each one of the 6 upper pads triggers a sample (1 to 6) from the selected Sampler Bank of VirtualDJ.
The leds of the Pads will be turned on if the slot is loaded (available) and will blink while playing.
Hold the SAMPLE button down and then press any of the 6 upper pads to stop the playing sample (useful when the unmute or stutter mode is selected)
Hold the SAMPLE button down and then use the TRAX encoder (9) to adjust the Master Volume of the Sampler.
Use the 2 lower Pads to select the previous and next Sampler Bank.
Hold the SAMPLE mode button down and then use the 2 lower Pads to select a different trigger mode for the selected Sample Bank (On/Off, Hold, Stutter and Unmute).
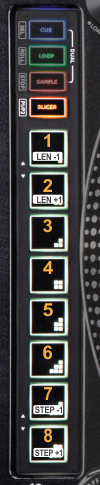
Slicer mode
The Slicer page will be automatically displayed on the PADS section of the default VirtualDJ GUI
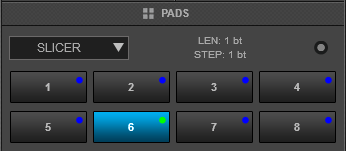
The 8 pads represent 8 sequential beats—"Slices"—in the Beat Grid. The playing Slice is represented by the currently lit pad. The light will "move through the pads" as it progresses through each 8-Slice phrase. Press a pad to repeat that Slice (hold it down if you want to keep looping it).
Once the Pad is released the track will continue to play from the position it would have been if the pad was never pressed.
While in Slicer mode, press the SLICER mode button again to set the PADs to Slicer Hold mode.(Led will blink)
In this mode the pads offer the same functionality as in the Slicer mode, but in this case, the Slice is memorized on first press as the track continues to play. (HOLD mode). The unlit Pad will indicate the currently playing Slice.
Hold the SLICER mode button down and then use Pads 1 and 2 to increase/decrease the length of the applied loop on the slice.
Hold the SLICER mode button down and then use Pads 7 and 8 to increase/decrease the step (size) of the slice.
CUE-LOOP & CUE-ROLL Dual modes
A special RP-HC+LOOP page will be automatically displayed on the PADS section of the default VirtualDJ GUI
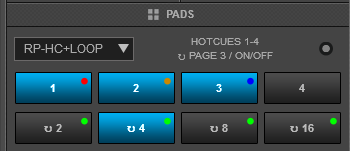
In this mode the 4 upper Pads trigger HotCues 1 to 4 or 5-8 depending on the value of the 1st Parameter of the RP-HC+LOOP page (operation available from the GUI only)
Hold the CUE button down and then use the 4 upper Pads to delete their assigned HotCues.
The 4 lower Pads trigger Loops 1/2 beats to 128 beat in size depending on the selected Loops page (via the 2nd Parameter of the RP-HC+LOOP page - operation available from the GUI only)
While a Loop is triggered, hold the LOOP mode button down and then use the TRAX encoder (9) to move the loop forward or backwards by half the size of the triggered loop
*If no Pad is pressed while the mode buttons are pressed, the CUE or SAMPLER single mode will be selected once the mode button is released.
While the Hotcue-Loop mode is selected, press the LOOP mode button to set the PADs to Hotcue-Roll dual mode (led of the LOOP button will blink)
A special RP-HC+LOOP page will be automatically displayed on the PADS section of the default VirtualDJ GUI
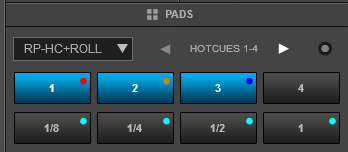
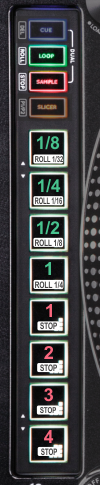
In this mode, the 4 low Pads trigger Loop Rolls from 1/8 to 1 beat. The upper pads behave the same as in the Hotcue+Loop mode
CUE-SAMPLER Dual mode
A special RP-HC+SAM page will be automatically displayed on the PADS section of the default VirtualDJ GUI
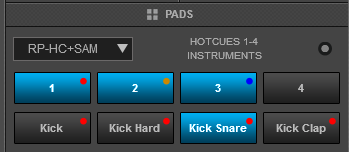
In this mode the 4 upper Pads trigger HotCues 1 to 4 or 5-8 depending on the value of the 1st Parameter of the RP-HC+SAM page (operation available from the GUI only)
Hold the CUE button down and then use the 4 upper Pads to delete their assigned HotCues.
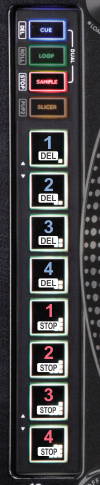
The 4 lower Pads trigger Samples 1 to 4 of the selected Sampler Bank.
Hold* the SAMPLER mode button down and then press any of the 4 lower pads to stop the playing sample (useful when the unmute or stutter mode is selected)
Hold* the SAMPLE button down and then use the TRAX encoder (9) to adjust the Master Volume of the Sampler.
*If no Pad is pressed while the mode buttons are pressed, the CUE or SAMPLER single mode will be selected once the mode button is released.
LOOP-SAMPLER & ROLL-SAMPLER Dual modes
A special RP-LOOP+SAM page will be automatically displayed on the PADS section of the default VirtualDJ GUI
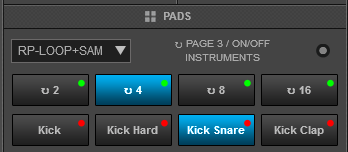
In this mode the 4 upper Pads trigger Loops 1/2 beats to 128 beat in size depending on the selected Loops page (via the 1st Parameter of the RP-LOOP+SAM page - operation available from the GUI only)
While a Loop is triggered, hold the LOOP mode button down and then use the TRAX encoder (9) to move the loop forward or backwards by half the size of the triggered loop
The 4 lower Pads trigger Samples 1 to 4 of the selected Sampler Bank.
Hold* the SAMPLER mode button down and then press any of the 4 lower pads to stop the playing sample (useful when the unmute or stutter mode is selected)
Hold* the SAMPLE button down and then use the TRAX encoder (9) to adjust the Master Volume of the Sampler.
*If no Pad is pressed while the mode buttons are pressed, the CUE or SAMPLER single mode will be selected once the mode button is released.
While the Loop-Sampler mode is sleected (both leds are solid), press the LOOP button again to set the Pads to Roll-Sampler mode (the led of the LOOP button will blink)
A special RP-ROLL+SAM page will be automatically displayed on the PADS section of the default VirtualDJ GUI
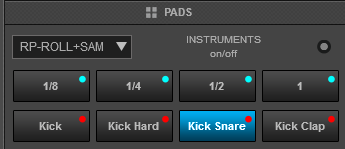
In this mode, the 4 upper Pads trigger a momentary Loop Roll from 1/8 to 1 beat.
the 4 lower Pads trigger Samples 1 to 4 of the selected Sampler Bank
Note: The Dual modes can be disabled-enabled by following this procedure:
- Power off the unit.
- While holding both the SAMPLER mode button and the TRAX encoder (9) down, power on the unit.
- Use PAD Nr.2 to enable/disable the Dual mode (On when enabled - Off when disabled).
- Push the TRAX encoder to save setting
Rear Panel

- AUDIO OUTPUT. Use the provided (or any standard) RCA cables to connect the RP-8000 with the Line/Phono Inputs of your DVS sound card or mixer.
- PH/LN. Switch to LN position in case your sound card or mixer, do not offer any Phono Inputs.
- USB. Use this socket to connect your Master (primary) turntable with the computer or connect any Slave unit to the TT LINK socket of the Master unit.
- TT LINK. Use this socket to connect a Slave Player
- AC IN. Use the provided AC cable to power the unit.
